The tunnel is modeled by defining data for each position along an infinite axis. The positions are grouped in sections, each 800 units long.

As the cart progresses along the axis, the algorithm computes new positions, so that at each moment 1400 positions ahead of the cart are available to be rendered. Positions behind the cart are no longer visible, and are overwritten by the new ones.

When entering a new section, the algorithm defines the characteristics of this section, by affecting new values to three persistent variables: the curvature, the slope and the shape. These variables are not independant, and simple rules ensure for instance that a section is never both curved and steep, and that there are not two flat+straight sections in a row. Thanks to this last rule, you never see the end of tunnel, which in this case is a good thing.

Then for each position inside the section, the algorithm combines these values with the functions that give the reference horizontal and vertical deviations, and stores the resulting x, x', y, y' values. They will be used by the rendering code to display elements present at this position.
The generation algorithm is indeed also responsible for creating the visible elements in the mine. So I started modeling the walls and other elements with cubes (a minecraft-esque obsession), but as the viewer always looks in the same direction, it is acceptable and much shorter/faster to display only viewer-facing rects, that I call blocks. This way the positions behave like layers, and a big part of the difficulty resides in hiding the fact that there is nothing between the layers. Most of the blocks are only present at 1 position every 10, because it is sufficient to simulate real 3D, but there are two exceptions: rails (present at 1 position every 5), and shiny furbee (we'll talk about it later), that allow the rendering of smooth curves.

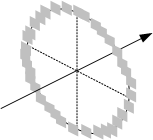
The walls are built by setting blocks along the circumference of the tunnel, with random phase shift and random blocks missing to obtain an irregular aspect. The circumference varies with the radius, whose variations depend on the shape of the section.
To speed up things a bit more, I got rid of the usual canvas reset: since you normally can't see the end of the tunnel nor through the walls, that means that all pixels will be repainted at each iteration by wall blocks, making it useless to reset them before. And if by chance Math.random() makes a hole in the wall big enough, this hole will be filled with the color of the block that was there in the previous iteration, and it is likely that the 2 colors are not very different. However, glitches are sometimes visible, but you know what ? I love them.
The other elements are pretty straightforward, except maybe the stalactites that need a little maths. Walls and stalactites generation could have been improved and even merged, but I preferred to work on the "Román Cortés challenge".
In the next part, I will talk about lights and rendering technique.
Side note: Javi Agenjo did a hell of a job reverse-engineering my entry, and you can learn many useful things from his explanations (don't miss his C64 home page and its moiré effect !).